Some kitchen guidelines and basics.
Some of these things will hopefully help you to save money and cut down on waste in the kitchen, with astronomical inflation and price of groceries these days, every penny pinched in the grocery budget can help pay the heating bill.
Soup Making 101

Soup Making 101 - Making Broth
At 13, I was taught the basics of soup making by my maternal grandmother (who was an amazing cook that worked in many restaurant and catering businesses throughout her life,) but I never really understood the nuanced patience that goes into a good broth. PATIENCE. Not something I ever had much of in my lifetime. Like most moms, and generally as an adult, I was always in a hurry and had a million things to do. My advice: save this for a Saturday in the fall. Put it on in the morning by throwing all the stuff in the pot and just let it go until lunch time. It only gets better with time.
Materials
- Vegetable scraps, leftover meat scraps such as chicken or turkey bones, leftover steak or roast beef.
Tools
- Large soup or stock pot with lid.
Instructions
- In a large stock pot, make desired broth base for your soup by putting vegetable scraps or meat scraps in the bottom of the pot and covering with tap water until the pot is filled within 2-3" from the top. Place on stove on high heat and bring to a boil. Reduce heat.
- Cover and simmer on low heat for at least 2-3 hours for best results, stirring occasionally.
- Once broth has simmered long enough, use a colander placed over a very large bowl and pour the broth and contents into the colander to strain out all the large bits of bone and meat.
- If making soup right away, put aside the colander to continue draining and allow it to cool. Set aside broth for use in your soup; we'll be adding it later.
- If desired, this broth can be frozen for future use. Allow broth to cool completely at room temperature for at least one hour. Once cooled, it can be placed into freezer safe jars or containers. My preference is to store it in large ziploc freezer bags taking care to get out all the air from the bag. Freeze flat on a cookie sheet; once frozen, these can be stacked in the freezer, taking up less space.
Notes
If freezing your broth, do not bother to season it. Seasoning of a soup comes later and will be dependent on the type of soup you're making because some spices just go better with certain things.
What good things can you use in a soup stock? I make it a habit to keep a plastic bag going in the freezer most of the year, adding vegetable scraps to the bag each meal I prep and then once it's full, cook some broth and freeze it on a weekend. Here are some of the things I use:
- onion skins
- carrot peels
- carrot ends
- mushroom stems
- sweet potato peels
- red potato peels
- cut ends of celery
- bits of scrap tomato (not many or it becomes to acidic)
- fresh herb ends and scraps such as chives, dill, cilantro, savoury, basil
There are some vegetables that are really tasty, but if you're making a stock or broth, for soup with additional ingredients, won't necessarily bring any good flavour to a stock. Not to say that they can't be used for soup, but usually, if you're using them, they are the primary vegetable in that soup or stock that you're making and shouldn't be mixed in with others. For example, a roasted red pepper soup is amazing, but adding red peppers to a basic vegetable stock will make the stock taste bitter. Here's a list of veggies which do not add good flavour to broth and should be skipped unless you're making them into a single veggie soup:
- peppers
- cabbage
- broccoli
- cauliflower
- kale
- turnip
- bok choy
- radishes
- carrot tops
- potatoes
- lettuce (hot, limp lettuce of any kind is gross! Just don't do it!)
- whole cherry tomatoes (I usually keep these separate and throw into the soup at the end)
- whole tomatoes
Canning & Preserving

Canning and Preserving
There's a billion dollars worth of fancy tools out there for canning and preserving. Although some of them do make your life easier or faster, they aren't a necessity to be able to preserve foods.
Tools
- A LARGE pot for boiling water
- A few tea towels
- Some tongs
- A good funnel
- A few dish cloths
- A pressure canner
- A jar rack for your canner
- Pint jars
- Regular canning lids (not wide mouth)
- Regular jar "bands" (the screw on top part of the lid)
Instructions
- A good supply of canning season items gets built up over years, but I didn't have anything when I first started making pickles and relish and jams. There's a few things you can just 'make do' with if you don't have a lot of space to store all the stuff that only comes out in the fall!
- The process of "canning" something is to remove bacteria and create something, usually in a jar, that is shelf stable and food safe for storage in the cupboard for extended periods of time. It's a useful skill to have to be able to make your garden a worthwhile investment of your time and to help save money on your grocery bill.
- The first thing I ever learned how to preserve was cucumbers by making them into bread and butter pickles. They are super simple and don't require any real processing or canning method -- you just cook them and stuff them into hot jars with boiling brine and seal them. They create a vacuum seal once they cool.
- Things such as relish, salsa, beans and many other foods require some additional processing in order to safely preserve them. This is usually in the form on what's known as a water bath in a canner OR a pressure canner.
- A water bath canner is really, at the heart of it, a glorified giant soup pot. You put the jars with their lids on them into the pot, fill it up with hot/boiling water and bring it to a boil. Once it's boiling, you start a timer and keep the water boiling for a specified period of time. The time varies based on the vegetable you're canning as well as your elevation.
- A pressure canner also, usually contains water, but it has the addition of sealing the pot with a special lid that traps and helps build up steam pressure in the pot. The pressure is measured by a gauge on the lid. Once your pressure canner reaches the correct pressure, you maintain that temperature to keep that pressure steady for a specified amount of time.
- I don't know if one method is any faster than the other, becuase with the pressure canner, you have to wait for the pressure to release through a valve and allow it to cool some before you can safely remove the lid. So, I suspect any time saved is probably replaced by that waiting process. However, since the steam is trapped in the pot, it would keep your kitchen a little cooler on those days of working on canning recipes. And that's helpful, because it gets mighty warm at the end of summer and into fall already, without a pot of boiling water on the stove for hours while you process batches of your goodies.
Notes
If you're just starting out with canning, the only things I'd really recommend investing in that are reasonably priced and don't take up a lot of space are a pair of those special rounded tongs for picking up hot jars and MAYBE a wide mouth funnel. That's IT! Here's how you can 'make do' to preserve your goodies:
You'll need a large pot. One that's deep enough to hold (ideally) 4-6 pint jars and enough water to completely cover the jars by at least one inch. Most cooking sets include that one giant looking soup pot--this is your friend in canning season!
In the bottom of the pot, place a tea towel, folded down to size to nicely line the bottom of the pot. This is to keep your jars from directly touching the bottom of the pot. Hot metal in direct contact with glass jars is a recipe for 'esploding' jars in your boiling water. No messy exploding jars for us baby!
Place your filled, closed jars (finger tighten the rings on your jars) on top of the tea towel in your pot.
Fill the pot with hot (boiling) water enough to completely cover the jars an inch or deeper with water. Place the pot on the stove and heat it to boiling. Once it's reached a good rolling boil, begin your timer for processing as specified in your recipe. MONITOR your water level and add more boiling water as needed to maintain coverage of the jars at least an inch over the tops of the jars.
Have a towel or two laid out on the counter to receive your jars once they're done processing. After the time is finished, use your canning tongs with the funky round heads to remove the jars carefully from the hot or boiling water. Place the jars on a towel on the counter to rest.
Don't touch the jars or move them around. Just allow them to cool at room temperature, slowly but surely. No need to rush them in the fridge or put them in front of a drafty window. This is a risk for breaking glass jars if it cools too quickly. Again, more mess and of course wasted food and efforts.
Label them with date and name of what's in the jar and store them in your cupboard. It's good to remove the jar ring top so you'll know if the jar became un-sealed.
There are good deals to be had on places like FB Marketplace and Kijiji for water bath canners. And you'll usually find people giving away jars all the time if you need some pint jars. The only thing you'll need to shell out for each season is probably some jar lids and possibly some jar rings but those are found pretty cheaply on Amazon, especially if you plan ahead and stock up before canning season is in full swing.
If you're purchasing lids and "bands" (I call them jar rings") look for regular size, as opposed to "wide mouth". Regular is 70mm and wide mouth are 86 mm.
The regular lids fit way more jars. Although you cannot reuse them for canning and sealing purposes (because once you heat that waxy rubber compound once, after you break the seal, it doesn't really do a good job of safely sealing again after that) they are useful for just closing jars around the house and keeping things in so they don't spill.
If you buy a lot of premade sauces in jars (spaghetti sauce, salsa, etc.) you can save those jars, wash them and sterilize the jar and reuse it for your canning. Just need a fresh lid and ring top and you're good.
I inherited my grandmother's pressure canner. I've replaced the rubber gasket seal on it. I've only used it as a water bath canner so far, and it's been nice having the extra room in it. I was able to process 8 or nine jars at once instead of batches of four. I'll try it with pressure this year and see how it goes. It can also cook big meals in short times. It's essentially what would now-a-days be known as an InstaPot, but it's way bigger. Which is beneficial for cooking large amounts of food, then I could go on a freezing bender too. But it's also really large and hard to store. It's been out in my shed for 14 years--I'd forgotten I even had it. Anyhow, I'll give it a shot this year and see what magic I can make. It's kind of nice to get back to some good old "homesteading" kind of habits, especially with grocery prices the way they are these days.
Turkey Roasting Timetable

Turkey Roasting Timetable
Instructions
This instruction card was taped inside Gramma Vanita's recipe card box and has a copyright of 1971 from General Mills
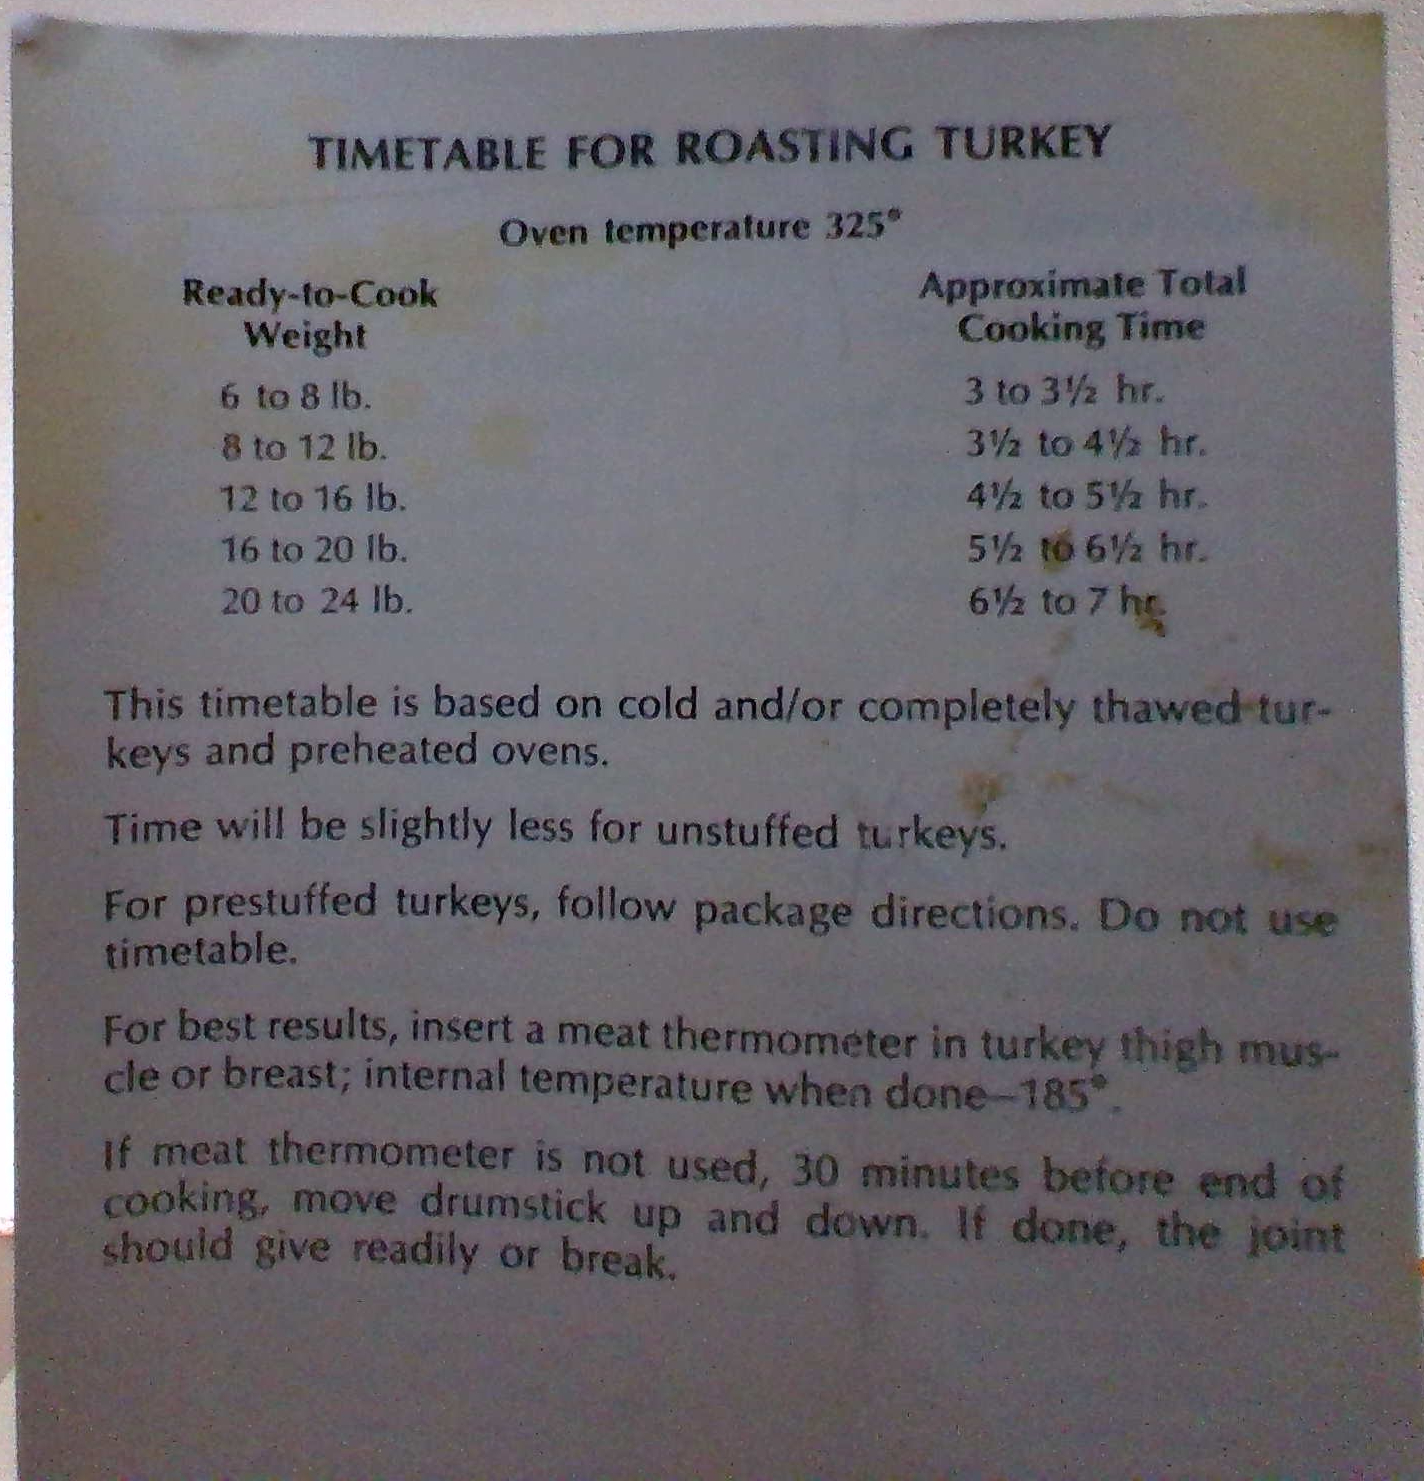
The cook times are based on cold, but completely defrosted turkeys with a cooking temperature of 325°F
The average is around 30 minutes per pound.
Notes
For converting pounds to kilograms, visit https://www.rapidtables.com/convert/weight/pound-to-kg.html
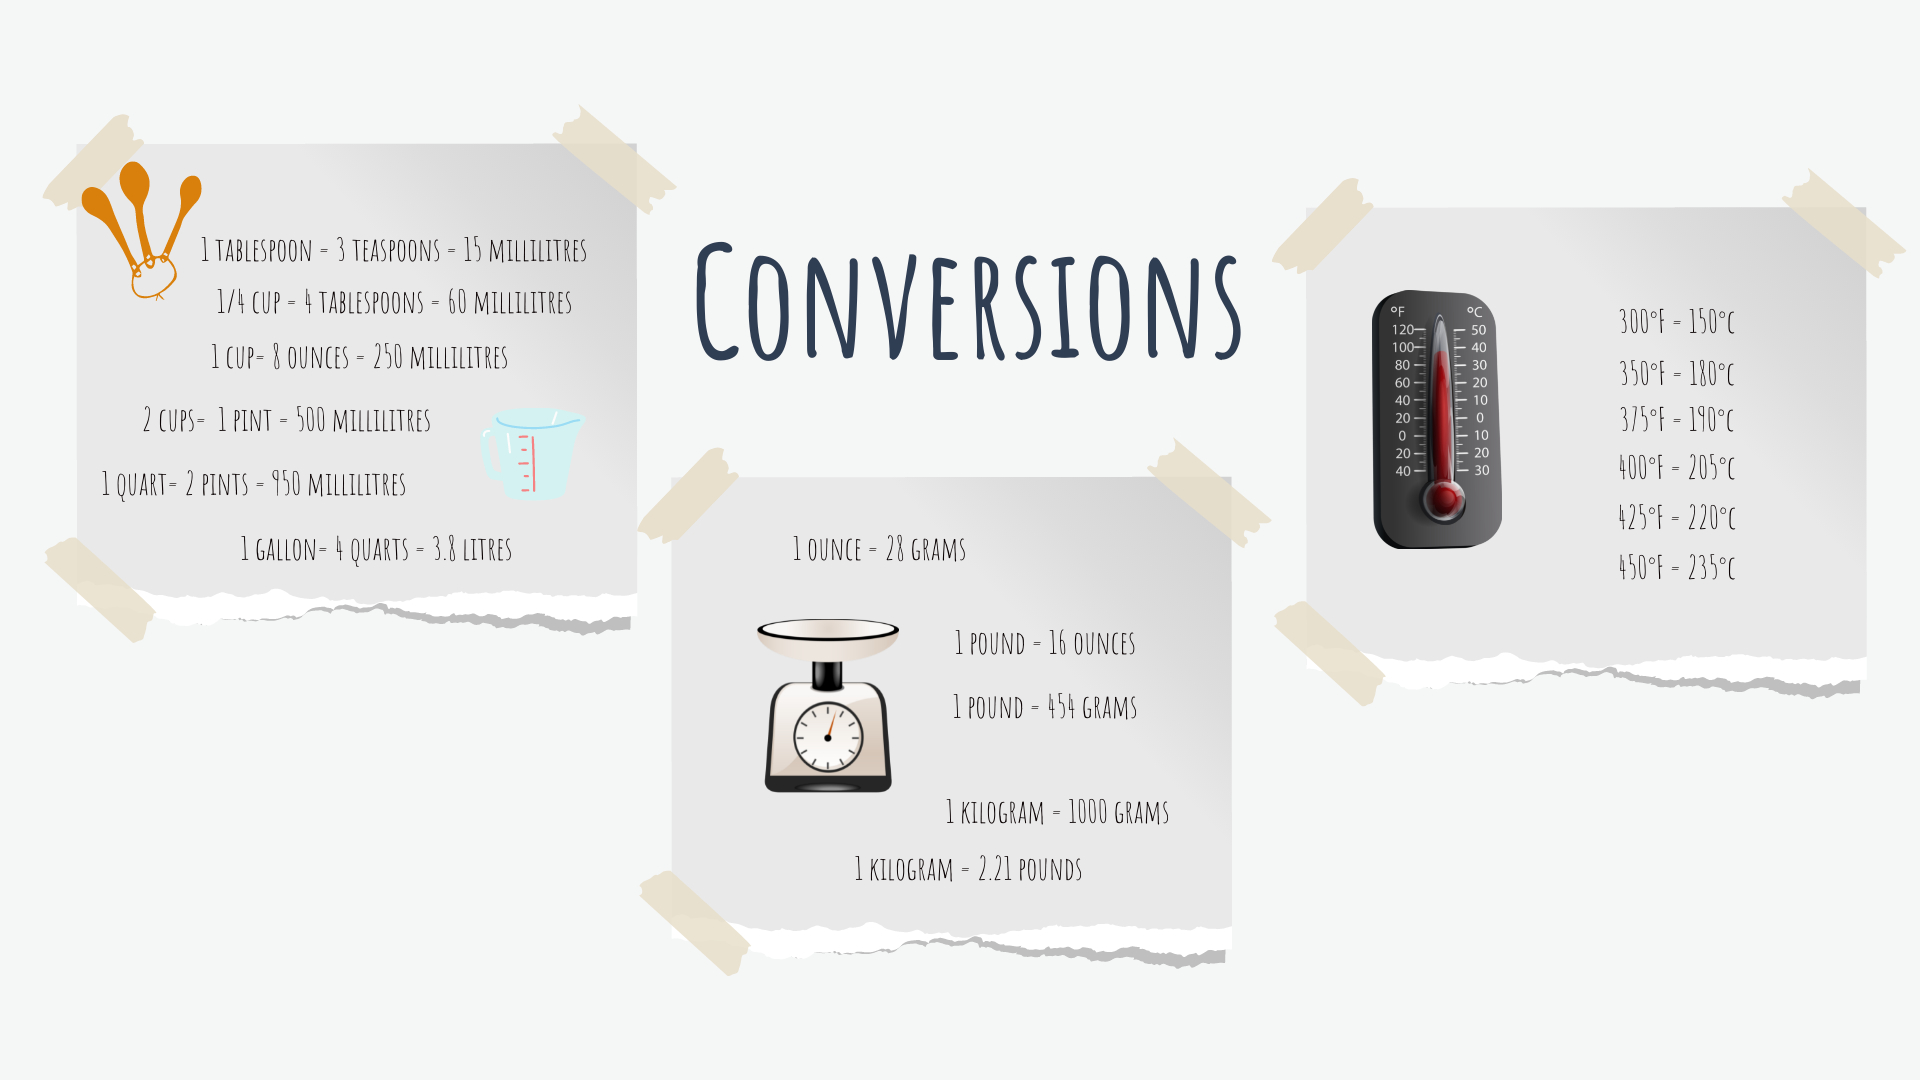
Conversions

Conversions - weight, temperature, volumes
Some of the common conversions for temperatures, weights and volumes.
Instructions
Budget Shopping
Here are some ideas to help you stay on budget while shopping.